Ninja Espresso and Coffee Barista System CFN601 Owner’s Guide
Download PDF user manual for SharkNinja Operating / NINJA Espresso & Coffee Barista System Model: CFN601 (EN) 24 pages CFN600Series_IB_REV_Mv5, CFN601_QSG_MP_Mv6, CFN600Series_Insert_CleanCycle_REV_Mv2 2022 zip
Description
This PDF user manual is for the Ninja CFN601 espresso and coffee barista system.
About the Item
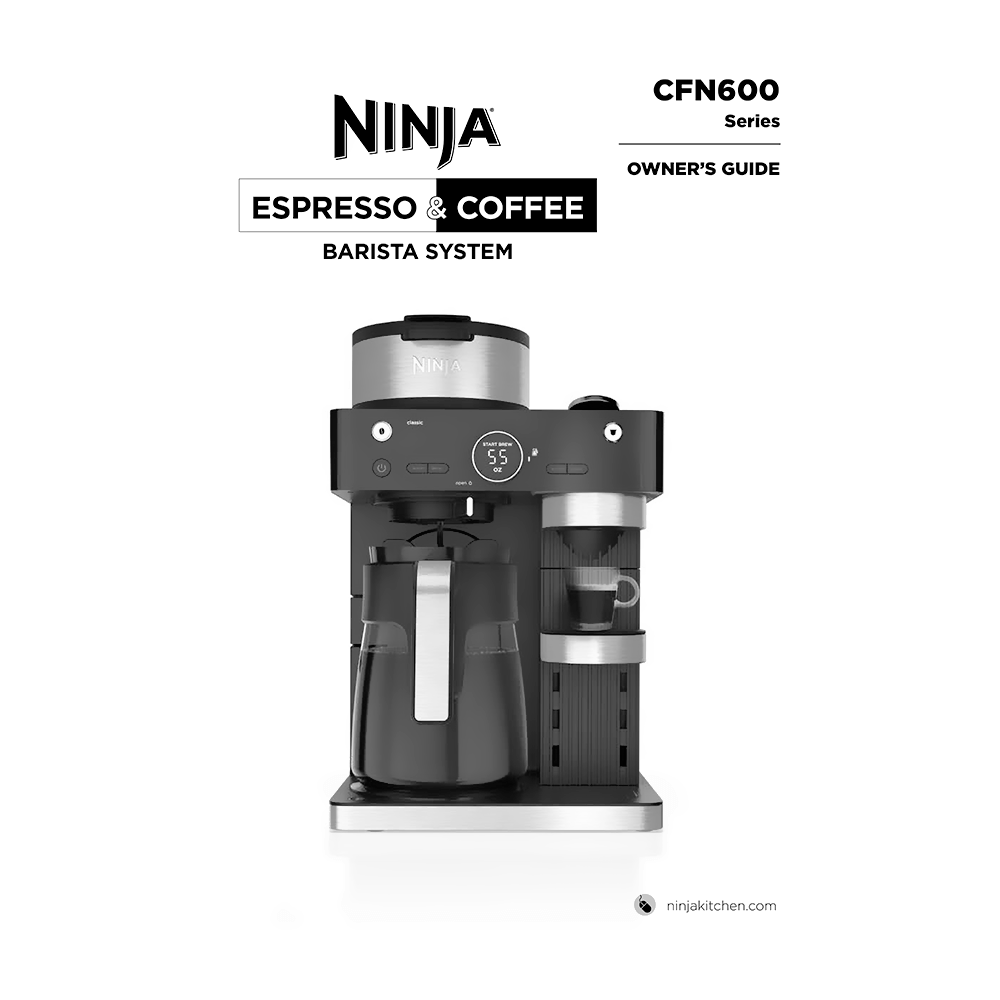
Ninja Espresso & Coffee Barista System Model: CFN601
The Ninja Espresso & Coffee Barista System allows you to brew with your favorite single-serve espresso capsules and coffee grounds. Brew a Classic, Rich, or Iced Coffee in up to 9 brew sizes from cup to carafe or brew an Espresso, Lungo, or Over Ice single-serve espresso with your favorite espresso capsules. Create coffeehouse drinks with the built-in, fold-away frother.
These instructions are designed to help you get a complete understanding of your new Espresso & Coffee Barista System.
Please read carefully and keep for future reference.
Document(s) available
(PDF) OWNER’S GUIDE
Available languages
ENGLISH (EN)
SUMMARY OF CONTENTS
– Technical Specifications
– Important Safeguards. Warnings
– Parts
– Using The Control Panel
– Preparing For Use
– Setting The Clock
– High-Altitude Calibration Brew
– Before The First Brew
– Priming The Capsule Side
– Priming The Ground Coffee Side
– Using The Ninja(R) Espresso & Coffee Barista System
– Brewing Capsules: Ristretto (not available on all models), Espresso, Lungo, or Over Ice Brew.
– Brewing Ground Coffee: Classic, Rich, or Over Ice Brew.
– Brew Styles
– Brew Volumes And Measurements. Grounds, Capsules, Coffee Measurement Chart.
– Intelligent Warming Plate
– Time & Temperature Adjustment
– Setting The Delay Brew (Grounds Mode Only)
– Using The Drip Stop
– Closing The Drip Stop After A Brew
– Integrated Frother. The Integrated Frother does not heat milk.
– Cleaning & Maintenance
– Cleaning After A Brew. Dishwasher Safe Parts.
– Cleaning The Water Reservoir
– Cleaning The Carafe
– Cleaning The Capsule Bin
– Cleaning The Brew Basket
– Cleaning & Descaling Your Brewing System. Descaling Grounds Side. Descaling Capsules Side.
– Product Registration
– Replacement Parts
– Warranty
– Troubleshooting Guide:
CAN’T SELECT KEEP WARM.
– Keep Warm can be turned on manually by pressing WARM while in Grounds mode with Classic or Rich, and any Carafe size selected. If brewing a smaller size into the carafe, after the brew has finished select Classic or Rich and turn the dial to any carafe size, then press WARM.
THERE’S SEDIMENT IN MY COFFEE.
– If using a permanent filter, this may be due to using finely ground coffee.
– To reduce the amount of sediment in the brewed coffee, use a slightly coarser grind or use a paper filter.
NOTE: DO NOT use a paper filter in conjunction with a permanent filter, as water and/or coffee can back up and clog the filter basket.
OVER ICE BREW IS NOT COLD.
– Ensure your cup, travel mug, or carafe is filled all the way to the top with ice cubes before brewing. Brewer will brew at elevated temperatures to lock in the best flavor, then the ice will cool the brewed coffee to the perfect temperature. Lower volumes of coffee will be brewed to account for some ice melt.
COFFEE IS TOO WEAK.
– For stronger coffee, use the Rich brew setting. For an even bolder flavor, you can add more coffee grounds to the filter.
BREW CYCLE IS TOO SLOW.
– The brew time will vary based on size and brew style. Full carafe sizes and Rich brews will take longer to brew than single-serve and classic brews. The progress bar on the control panel will indicate brew status.
CUP OR TRAVEL MUG OVERFLOWED.
– Refer to the Approximate Brew Volumes chart on page 10.
BREW BASKET OVERFLOWED.
– The bottom of the brew basket may be clogged. This can happen with finely ground coffee or too many coffee grounds in the filter. Medium-grind coffee is recommended.
– Using both the permanent filter and a paper filter can cause grounds to clog and water to back up in the brew basket. Use only the permanent filter or a paper filter.
– Decaf coffee grounds absorb water differently, so use fewer scoops when using decaf.
THERE IS WATER LEFT IN THE RESERVOIR.
– When the reservoir is filled to a specific size and then that size is brewed, there will be some water left in the reservoir. This is normal to ensure the reservoir does not run dry for the best performance of the pump and brew system.
BREWER IS LEAKING.
– After removing the water reservoir, there may be a small amount of water in the reservoir valve. This can be easily removed with a dry cloth.
– If the leak is coming from above the brew basket, refer to “Brew basket overflowed.” above.
– If the leaking is coming from below the brew basket, close the drip stop. Refer to page 12 for more information.
– If the leaking is coming from the capsule side, ensure the adjustable cup tray is in place to catch any excess drips.
– If the leak is coming from the bottom of the brewer, call Customer Service.
INTELLIGENT CLEAN CYCLE INDICATOR IS ILLUMINATING ORANGE.
– Run a clean cycle. If you have recently completed a clean cycle, you may need to run another cycle to remove additional mineral buildup that occurs naturally over time and is common in hard-water areas. Make sure you are using vinegar or a descaling solution and follow the cleaning instructions on pages 13 and 14.
COFFEE IS NOT HOT ENOUGH.
– If brewing into the carafe, ensure Keep Warm is on. The Intelligent Warming Plate temperature can be adjusted between Low, Medium, and High (see Time & Temperature Adjustment on Page 11.)
– Adding cold milk or creamer to coffee will effect the temperature.
– We recommend prewarming the cup with hot water before brewing.
CAPSULE DOESN’T FIT / CAPSULE IS GETTING CRUSHED
– This brewer is only compatible with Original Capsules.
– Ensure the capsule is being inserted in the correct orientation as shown on the unit
– The Capsule Bin may be full. See page 13 for how to remove Capsule Bin.
BREWER IS LOUD
– This brewer uses a high pressure pump in order to evenly saturate and extract flavor of the capsules.
LEVER NOT CLOSING COMPLETELY
– Empty the Capsule Bin. Ensure all used capsules are removed and no capsule is blocked.
COFFEE IS SPLATTERING.
– Some splatter is normal. Use the cup tray when possible to reduce the distance between the cup and the coffee outlet.
WATER RESERVOIR IS UNSTABLE.
– Ensure the water reservoir is installed securely on the hook.
CLOCK DISPLAY MESSAGES:
End : The brew cycle is complete.
PrE : While brewing capsules, once START BREW has been pressed the clock display may show “PrE”. This indicates the brewer is preheating and the brew will automatically start once the brewer is up to temperature.
Add Wtr :
– Ensure water is in the reservoir. If the reservoir is empty, add fresh water to the reservoir and then press START BREW to resume the brew.
– If the reservoir is filled with water, remove and reseat the reservoir and then press START BREW to resume the brew.
– If brewing capsules, try removing the capsule and brewing again. If the issue persists, run a clean cycle on the capsule side following the instructions on page 14 and 15.
– If brewing grounds and the issue persists, contact Customer Service.
CLn : The system has detected that a clean cycle needs be run immediately to remove calcium scale buildup in the heater. See ‘Cleaning & Descaling Your Brewing System’ for instructions.
StOP : A brew cycle was cancelled.
ERROR MESSAGES:
Er : If the clock displays “Er” and then a number (ex. “Er 03”), contact Customer Service.
NINJA ESPRESSO & COFFEE BARISTA SYSTEM QUICK START GUIDE
NINJA ESPRESSO & COFFEE BARISTA SYSTEM CLEAN CYCLE INSTRUCTIONS
Why download the Manual?
This owner’s guide provides all the information from SharkNinja Operating / NINJA about the model CFN601 espresso/coffee barista system, as detailed in the table of contents. Reading it completely will address most questions you might have. You can download and save it for offline use, including viewing it on your device or printing it for your convenience if you prefer a paper version.
How to download the Manual?
Download it by clicking the button below
Helped you out?
Glad to hear that. It would be awesome if you could . . .


